
Seed Potatoes - A complete guide
Potatoes form the basis of so many fantastic dishes and meals. Whether roasted, mashed or cut into thick, thin, or chunky chips, we all have our favourite way to eat one of nature’s most versatile crops.
Potatoes (Solanum tuberosum) are tubers that grow and form at the plant’s roots. The plant also produces flowering shoots that appear above ground.
These edible tubers, an important carbohydrate, are also rich in potassium. They make a versatile ingredient, eaten both hot and cold and prepared in a variety of ways. Luckily, it is easy to grow potatoes at home, both in containers and the ground, and just a few plants have the potential to provide large harvests.
When to plant potatoes

When you buy your seed potatoes, take some time to research the variety name and what kind of potato they are, as different varieties are suitable for different cooking methods. Generally, young potatoes are better for boiling and salads, as they contain less starch and so don’t break down as quickly, while larger potatoes are best suited to mashing and baking.
In the UK, potatoes are categorised into three groups: first-earlies, second-earlies and maincrop. These groups indicate when to plant potatoes and when to harvest potatoes, although these times can differ depending on your last local frost dates.
- First-earlies are quick to crop, usually planted in late March and harvested in June to July. These small potatoes are often referred to as new potatoes. With a thin skin and sweeter taste, they are best eaten fresh and are not suitable for storing.
- Second earlies are usually planted in the first half of April and harvested July to August. These will be larger than first-earlies, but smaller than maincrop.
- Finally, maincrop potatoes are planted in the second half of April and harvested from August to October. These are invariably larger and can be stored and eaten throughout the winter.
Potato growing equipment list
Here’s what you’ll need to get started growing potatoes:
- Seed potatoes
- Potato fertiliser
- Deep container or grow sack
- Trowel
- Garden fork and spade
- Watering can
- Storage crates, bags, or sacks
How to plant potatoes
Rather than use old sprouting potatoes, it is recommended to buy certified seed potatoes, as they will be deemed disease free. Seed potatoes are available from late winter to spring. If you purchase them prior to planting, you can give them a head start by allowing them to chit.
The process of chitting involves leaving seed potatoes in a cool, light, and frost-free place to sprout. Take care when handling sprouting potatoes, as the sprouts are fragile and can break off. If you don’t have time to chit the potatoes before planting, they should still sprout underground but it may take a bit longer for the shoots to appear.
Planting potatoes in the ground
- Potatoes grow in most soil types, but crop best in loose, fertile soil in full sun.
- You can prepare your soil by adding well-rotted manure the autumn before planting, or potato fertilisers prior to planting.
- Dig shallow trenches 7.5-15cm (3-6in) deep and plant the potatoes with the sprouts, or eyes, facing upwards. If you are planting first-earlies, you can plant them closer to each other.
- Backfill and cover the seed potatoes with soil before watering. Try not to water too frequently before you see shoots, as seed potatoes can rot in waterlogged soil.
Planting potatoes in containers
If your soil is a heavy clay, or you are short of space, you might have more success growing potatoes in raised beds, or containers. While you can grow maincrop potatoes in containers, the restricted room for tubers to form may mean it is preferable to select first- or second-early varieties, as they have smaller tubers.
- Allow about 10 litres of compost per seed potato, so for a 40-litre container, plant up to four seed potatoes.
- When planting potatoes in containers, use a good quality compost and potato feed, and make sure the container, or sack has adequate drainage holes.
- Fill the container a quarter full with compost and place the seed potatoes on the compost surface, again with their shoots or eyes facing up.
- Continue to cover the seed potatoes with more compost to about an inch below the top of the container. Give it a water and wait for the shoots to appear.
How to grow potatoes
While in active growth, keep the plants well-watered, especially during dry spells, and continue to feed for higher yields. Flowers are a sign that potato tubers are forming in the soil.
You will also need to ‘earth up’ or mound the soil around the base of the plants as they continue to grow. This helps to keep the plant roots cool and protects tubers forming near the soil surface from exposure to the sun, where they run the risk of turning green and poisonous.
Potato shoots are tender, so if shoots appear during forecasted frosts, you can protect them with cloches or horticultural fleecing. This is another benefit to growing potatoes in containers, as you can easily move the containers undercover if there is a risk of frost.
Varieties of potato
The texture of cooked potatoes varies between waxy and flowery and some are best for boiling, others for roasting and even more for chips. For example ‘Red Duke of York’ is useless when boiled, as it falls apart, but for roast potatoes or mashed there is nothing to beat it. For examples of the variety available check out the table below:
| First Earlies | Second Earlies | Maincrop | Salad |
|---|---|---|---|
| Rocket | Estima | Desiree | Lady Christl |
| Foremost | Wilja | Romano | Pink Fir Apple |
| Epicure | Kestrel | Maris Piper | Ratte |
Growing potatoes: soil and position
Potatoes will grow in almost any soil, however, they cultivate much better if the soil is enriched with heaps of organic matter. Potatoes grow best in an acid soil so add well-rotted manure and garden compost. It is also important that you do not lime soil at any time.
How to grow potatoes in your garden
How to grow potatoes in grow bags
After chitting your potatoes, take five or so tubers and plant into your bag specifically designed for growing potatoes, around 10-12 centimetres deep, with the shoots facing upwards. Add more compost into the bag until each tuber is covered with a gap of around 5 centimetres to the top of the bag.
An application of a high potash fertiliser at the rate suggested on the pack will increase yields. Avoid fertilisers high in nitrogen as these will delay maturity of the crop.
Water the compost as to make sure to keep it moist, especially around flowering time. Do not saturate the compost as this will cause severe rot!
First early potatoes arrive around June/July time, when the leaves have fully matured and opened. Second earlies and salad can be harvested and eaten at the same time of year.
For main-crop potatoes, look to store your potatoes in a hessian bag in a cool, dry environment. The potatoes will be ready to harvest once there is a yellow colouring on the stems and leaves. Then remove the stems and harvest 7 days later in full.
For plenty of small ‘new’ potatoes ready to eat in July, plant a variety known as ‘early’. For a large crop of big tubers that will be ready in September and can be stored for months, go for a ‘maincrop’.
Growing seed potatoes
By buying seed potatoes, you are able to begin growing them before planting them in January/February time. Seed potatoes are actually small tubers specifically grown for the purpose. Remember, always buy certified seed potatoes - this way you will then know they are free from virus infections.
Seed potatoes are normally available in the first few months of the year, well before they can be planted outside.
Chitting potatoes
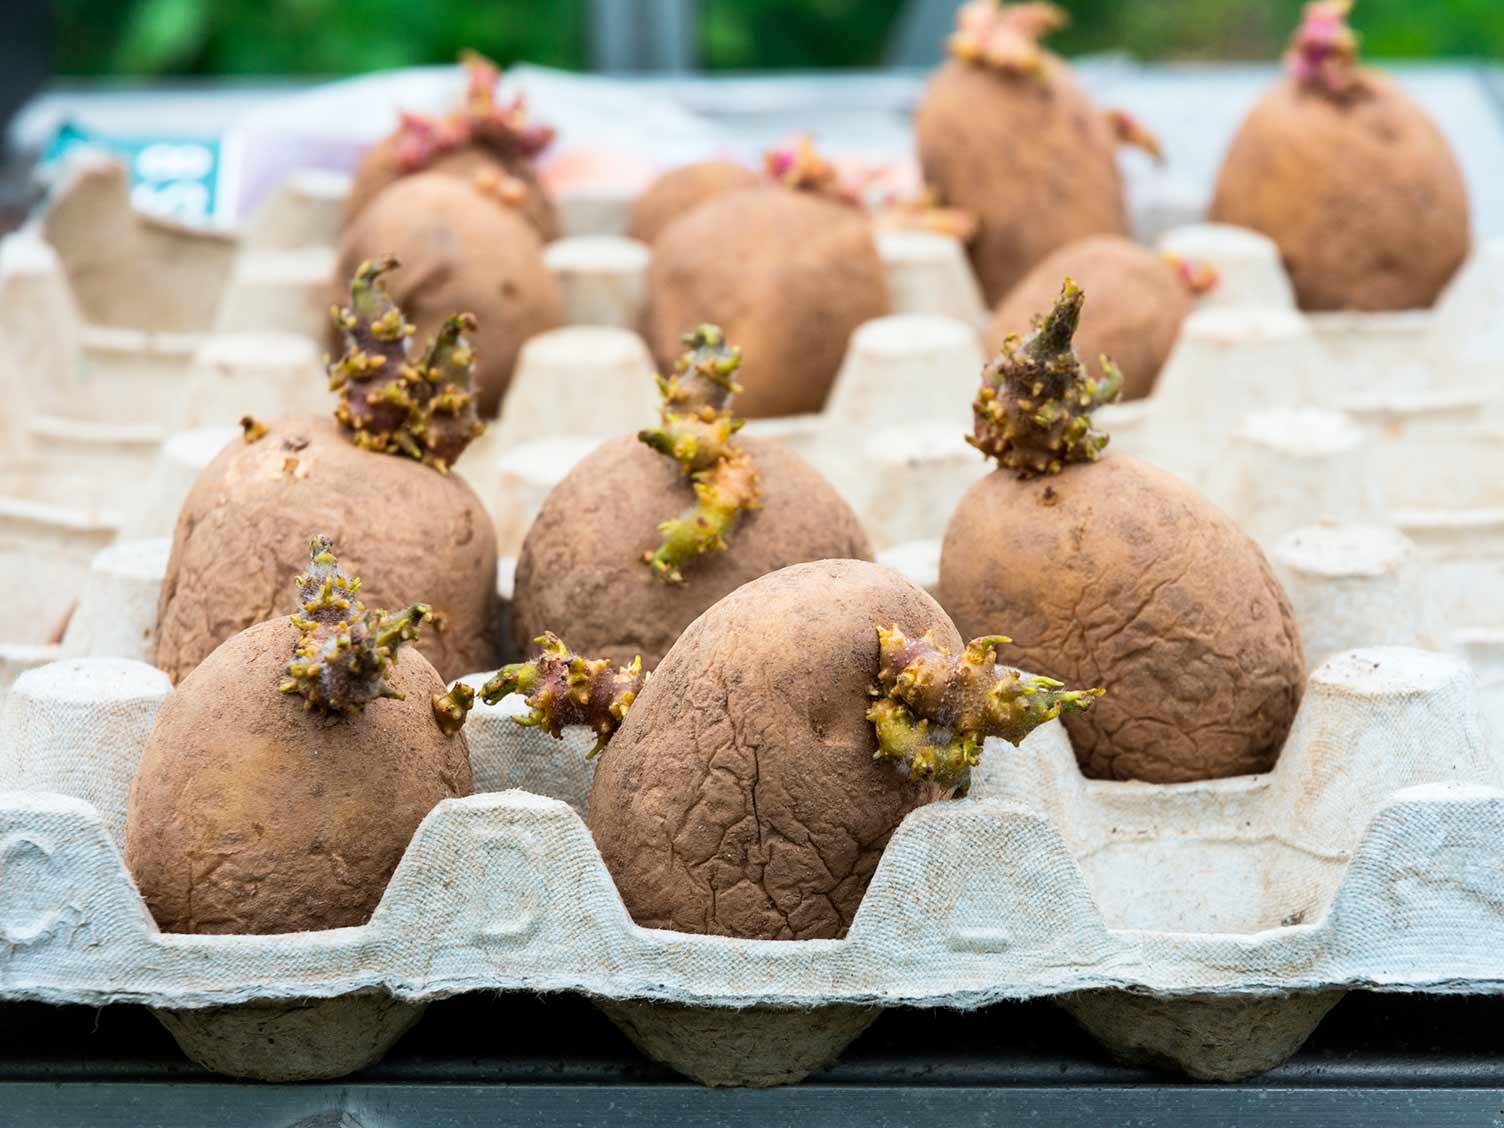
To get them growing when you buy them, place them in egg boxes or a seed tray, with the end with most eyes or buds facing upwards. Stand them somewhere that is cool, but frost-free, and in good light. The aim is to produce small, sturdy, green shoots. To get the biggest crops it’s important to ‘chit’ your seed before planting. This technique called ‘chitting’, is said to improve yields, but probably is used only to gain a few weeks in the time needed for growing earlies in the ground and to provide the right conditions for storage.
There are a number of methods for growing potatoes – for example, under black polythene or in large containers. To plant using black polythene, plant the tubers through the black polythene. An advantage of this method is that there is no longer a need to earth up the new potatoes so there is no digging involved to harvest them. If you choose to use containers, line the bottom of the container (15cm/6in) with potting compost and then plant the tuber below.
Keep adding the compost until the container is full, as the stems begin to grow. Remember, newly emerging foliage is susceptible to damaging frost – avoid this by earthing up with the surrounding soil or by covering the shoots with a fleece.
Planting seed potatoes
The tubers are ready to plant when the shoots are about 2.5cm (1 in) long. In late March or April dig a trench 15cm (6in) deep and plant the potatoes. Carefully push your seed potato (with the shoots facing upwards) into the loosened compost leaving a gap of 30cm (12in) between each one. Take care not to damage the shoots as you plant the seeds and ensure the potatoes are evenly spaced and not touching each other. Leave a space of 60cm (2ft) between rows. Fill the trench with soil mixed with garden compost, or other organic matter, for harvesting from the end of June.
Caring for potatoes
When the green shoots have grown to 20-30cm (8in-1ft) tall pull some extra soil around the stems to make a ridge. This soil is to exclude light from the potatoes that are forming on the surface. Water in dry weather. A liquid feed every fortnight of a general fertiliser can help grow yield.
Common potato problems
Potato blight
This is a common disease that occurs in damp, warm summers. Initially, a brown watery rot will rapidly spread affecting both the stem and the leaves. In terms of tubers, they turn a reddish-brown colour when infected. They appear firm to begin with, but then develop into a soft rot below the skin. Potato blight is a difficult one to remedy, as unfortunately once it has struck, it is not easy to stop. There is currently no chemical product that can be used to fight blight, however you can apply a protectant in June if you predict the summer to be a wet one.
Potato blackleg
A common disease, blackleg is a bacterial disease which causes blackened rotting at the base of the stem. Infection can cause stunted growth and yellow-coloured stems. Tubers may turn grey/brown and rotten if they continue to form. To remedy this problem, destroy all infected potatoes and rotate crops. It is advisable to purchase resilient potatoes varieties to avoid this problem – varieties such as ‘Charlotte’ and ‘Pixie’ are best.
Potato scab
Causing scab-like lesions on the surface of the potato, this disease is easily removed from the outer skin by peeling and does not affect the taste of the potato itself. There is no remedy for potato scab as such as you most likely will not recognise the issue until harvest time. The best advice is to keep your potatoes well watered as scab worsens in dry weather.
Potato rot
Potato rot is a significant problem that follows a wet growing season, especially if the tubers are lifted from wet soil. The best way to remedy potato rot, is to use good quality sees tubers that are resistant certified, and ensure you harvest at a time when the soil is not wet nor dry. Also, make sure to store your potatoes in cool and dry conditions.
Slugs
A huge nuisance where potatoes are concerned, slugs will eat holes in the potato leaves, and will burrow into the tubers themselves. The tell-tale sign of a slug problem is the slime trail visible on the soil near your crop, and also on the leaves themselves. There are so many ways to remedy this common problem, the best advice is to experiment and see which solution best suits your problem.
How to harvest potatoes
Dig up the whole plant with a fork or spade, taking care not to spear any potatoes in the process. Some potatoes will fall away easily, while others can be gently detached from the plants’ roots.
After harvest, you can leave the potatoes somewhere dry to cure, giving soil left on the potatoes a chance to dry up, which makes cleaning easier. When selecting which potatoes to eat and which to store, test the skin with a finger. Those with skin which tears easily when pressed should be used quickly, while those with a firmer skin can be stored. Store somewhere dark, cool, and well ventilated, such as a paper bag or burlap sack.
There’s nothing quite like growing, cooking, and eating your own potatoes. Just think of the culinary possibilities.
Blue Diamond work closely with https://www.lovethegarden.com who have provided the content for this work.